|
|
|
Marker Bar Library TutorialTable of ContentsIntroductionA marker bar is a stripe, typically next to a scroll bar, that visually indicates where objects fall in a document. Each visual indication along the bar is called a marker, because it marks a place in the document. If the document is long, a marker tells the user where he or she needs to scroll in order to see a particular object. Popular applications such as Visual Studio, Eclipse, NetBeans, and MATLAB all use a marker bar to visually indicate where compiler errors and breakpoints fall in a file. Here is a screen shot of a marker bar within NetBeans.
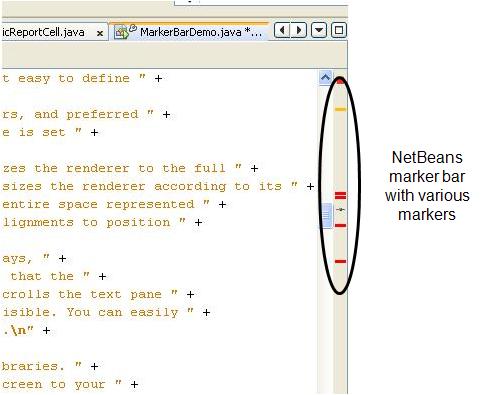 Although the above screen shot shows markers for compiler errors, source code suggestions, and the current cursor position, the possible uses for markers are endless. Markers can also represent search matches, bookmarks, headings, file differences, and anything else conceivably found in a document. JMarkerBarThe Marker Bar Library contains a Java Swing component,
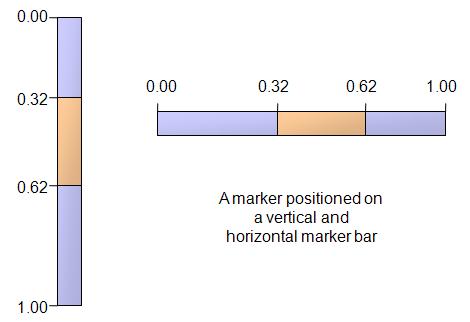
In the United States locale, the following code snippet creates a vertical JMarkerBar markerBar = new JMarkerBar(); markerBar.setOrientation( JMarkerBar.PAGE_AXIS ); panel.add( scrollPane, BorderLayout.CENTER ); panel.add( markerBar, BorderLayout.LINE_END ); Defining MarkersYou can think of a marker bar as a range from 0.0 to 1.0, where 0.0 represents the start of the bar and 1.0 represents the end. Then each marker defines a range within the marker bar's range. For example, a marker may define the range [0.32,0.62], as in the following illustrations.
 The
  public interface Marker
  {
    public double getStart();
    public double getEnd();
    publid double getShortDescription();
  }
The
A
The following code creates a marker bar with a hard-coded marker. DefaultListModel markerModel = new DefaultListModel(); markerModel.addElement( new DefaultMarker( 0.12, 0.15 )); JMarkerBar markerBar = new JMarkerBar( markerModel ); The marker range in the above example is arbitrary and used stricly as an example. Ranges typically correspond to locations within a text component, list, or table. Therefore, the library provides static public static double[] listIndexToMarkerRange( JList list, int row ); public static double[] listRangeToMarkerRange( JList list, int startIndex, int endIndex ); public static double[] textIndexToMarkerRange( JTextComponent textComponent, int index ); public static double[] textRangeToMarkerRange( JTextComponent textComponent, int startIndex, int endIndex ); public static double[] tableIndexToMarkerRange( JTable table, int row, int column ); public static double[] tableRangeToMarkerRange( JTable table, int startRow, int startColumn, int endRow, int endColumn ); The following code uses one of these DefaultListModel markerModel = new DefaultListModel(); double[] markerRange = Utility.textRangeToMarkerRange( textPane, 12, 19 ); markerModel.addElement( new DefaultMarker( markerRange[0], markerRange[1] )); JMarkerBar markerBar = new JMarkerBar( markerModel ); Providing a Marker ActionA user can "activate" a marker by clicking on it in the marker bar. An action event is then sent to all registered listeners of the marker bar. You can register an action listener invoking
  markerBar.addActionListener( new ActionListener() {
    public void actionPerformed( ActionEvent event )
    {
      int markerIndex = markerBar.getClickedIndex();
      Utility.scrollToMarker( componentToScroll, markerBar, markerIndex );
    }
  } );
Listeners can determine the marker that was clicked by calling public static void scrollHorizontallyToMarker( JComponent componentToScroll, Marker marker ); public static void scrollVerticallyToMarker( JComponent componentToScroll, Marker marker ); public static void scrollToMarker( JComponent componentToScroll, JMarkerBar markerBar, int markerIndex ); Customizing the MarkersJust like DefaultMarkerRenderer markerRenderer = new DefaultMarkerRenderer(); markerRenderer.setColor( Color.GREEN ); markerRenderer.setBorder( BorderFactory.createLineBorder( Color.BLACK )); markerRenderer.setMinimumSize( new Dimension( Integer.MAX_VALUE, 3 )); markerRenderer.setPreferredSize( new Dimension( Integer.MAX_VALUE, 3 )); markerRenderer.setAlignmentY( 0.0 ); markerBar.setMarkerRenderer( markerRenderer ); By default, the rectangle will be drawn the full width of the bar and the full height corresponding to the marker's range. You can adjust the dimensions of the rectangle by setting the
If
  public class CustomMarkerRenderer implements MarkerRenderer
  {
    private static final MarkerRenderer SEARCH_RENDERER = ...
    private static final MarkerRenderer COMPILER_RENDERER = ...
    private static final MarkerRenderer DIFF_RENDERER = ...
    private static final MarkerRenderer CURSOR_RENDERER = ...
    private static final MarkerRenderer DEFAULT_RENDERER = ...

    public Component getMarkerRendererComponent( JMarkerBar markerBar, int markerIndex, Marker marker )
    {
      if( marker instanceof SearchMarker )
        return SEARCH_RENDERER;
      else if( marker instanceof CompilerMarker )
        return COMPILER_RENDERER;
      else if( marker instanceof DiffMarker )
        return DIFF_RENDERER;
      else if( marker instanceof CursorMarker )
        return CURSOR_MARKER;
      else
        return DEFAULT_MARKER;
    }
  }
Such a renderer allows you to build sophisticated marker bars with a mix of colors, styles, borders, shapes, and sizes.
Home | Contact Us | Privacy Policy
Copyright © 2016 Side of Software, a branch of Natavision. All rights reserved.
|
||||||||||||||||||||||||||||